Set B - Syllogistic Arguments
The Star Test
A
syllogism is a vertical sequence of one or more wffs in which each letter occurs twice and the letters "form a chain" (each wff has at least one letter in common with the wff just below it, if there is one, and the first wff has at least one letter in common with the last wff). The last wff in a syllogism is the
conclusion. The other wffs (if any) are
premises. Here are two examples of syllogisms:
no P is B
some C is B
∴ some C is not P |
a is F
a is G
∴ some F is G |
An instance of a letter is
distributed in a wff if it occurs just after "all" or anywhere after "no" or "not." The distributed letters here are underlined:
all A is B
no A is B |
some A is B
some A is not B |
x is A
x is not A |
x is y
x is not y |
The star test for syllogisms has two steps:
- Star premise letters that are distributed and conclusion letters that aren't distributed.
- Then the syllogism is VALID if and only if every capital letter is starred exactly once and there is exactly one star on the right-hand side.
The first few times, you might want to underline all the distributed letters – and then star premise letters that are underlined and conclusion letters that aren't underlined. Here are three examples:
no P* is B*
some C is B
∴ some C* is not P |
Valid – every capital
starred once and one
right-hand star. |
no P* is B*
some C is not B*
∴ some C* is P* |
Invalid – P and B
starred twice and three
right-hand stars. |
a is F
a is G
∴ some F* is G* |
Valid – since small
letters can be starred
any number of times. |
English Arguments
You test an English syllogism by first translating it into symbols (using the same letter for the same idea and different letters for different ideas) – and then testing the symbolic argument using the star test:
No pure water is burnable.
Some Cuyahoga River
water is burnable.
∴ Some Cuyahoga River
water is not pure water. |
no P* is B* Valid
some C is B
∴ some C* is not P |
When you do an English argument, first try to give an intuitive appraisal of whether the argument is valid or invalid; then work it out in symbols and see whether this gives the same result. If your intuition clashes with the test, then you made a mistake on one or the other; think about the problem further and try to catch what you did wrong. Using this two-prong attack on arguments trains your logical intuitions and gives you a double-check on the results.
Deriving Conclusions
To derive a syllogistically valid conclusion from premises, use either intuition (checking your result with the star test) or these rules:
- Translate the premises into logic and star the distributed letters. If rules are broken, then nothing validly follows and you can stop.
- The two letters occurring just once in the premises will occur in the conclusion.
- If both conclusion letters are capitals: if all the premises are universal (have "all" or "no"), then use the "all A is B" or "no A is B" form in the conclusion; otherwise, use "some A is B" or "some A is not B."
If just one conclusion letter is small: use the "x is A" or "x is not A" form in the conclusion.
If both conclusion letters are small: use the "x is y" or "x is not y" form in the conclusion.
Use the negative form ("no" or "not") if there's a negative premise.
- Formulate the conclusion and test using the star test. If the argument is invalid, try switching the order of the letters.
Suppose that you want to derive a conclusion from these premises:
some A is B
all B is C
∴ ??
|
First you star the premises and see that no rules are broken:
some A is B
all B* is C
∴ ??
|
The conclusion will have "A" and "C" – two capital letters. And the conclusion will have "some" – since you have a "some" in the premises. Also, it will be positive (have "some ... is ..." instead of "some ... is not ...") – since the premises don't have "no" or "not." So you try "some A is C" in the conclusion:
some A is B Valid
all B* is C
∴ some A* is C*
|
This works out as VALID. If it didn't come out valid, we'd try switching the letters in the conclusion to see if that would give us a valid argument.
The exercises in the book and on the computer use English premises – and require that you derive a conclusion in English (not in wffs) that follows validly from and uses all the premises. Sometimes no such conclusion follows.
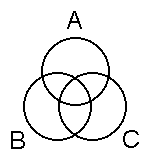
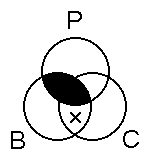
Venn Diagrams (Circles)
Venn diagrams give another way to test traditional syllogisms (two-premise syllogisms with no small letters). First we draw three overlapping circles, labeling each with one of the syllogism's letters:
Visualize circle A containing all A-things, circle B containing all B-things, and circle C containing all C-things. Within the circles are seven distinct areas:
- The central area, where all three circles overlap, contains whatever has all three features (A and B and C).
- Three middle areas contain whatever has only two features (for example, A and B but not C).
- Three outer areas contain whatever has only one feature (for example, A but not B or C).
Each of the seven areas can be either empty or non-empty. We shade the areas that we know to be empty. We put an "x" in the areas that we know to contain at least one entity. An area without either shading or an "x" is unspecified; it could be either empty or non-empty. After we've drawn our three overlapping circles, we diagram the premises following the directions below. The syllogism is VALID if and only if drawing the premises
necessitates drawing the conclusion.
We first draw "no" and "all" premises, by shading areas; then we draw "some" premises, by putting an "x" in some area that isn't already shaded. Here is how we draw the statements:
"no A is B"
Shade wherever
A and B overlap. |
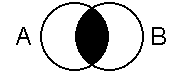 |
"some A is B"
"x" an unshaded area
where A and B overlap. |
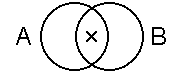 |
"all A is B"
Shade areas of A
that aren't in B. |
 |
"some A is not B"
"x" an unshaded area
in A that isn't in B. |
 |
In some cases, consistent with the above directions, we could put the "x" in either of two distinct areas. When this happens, the argument will be invalid; to show this, put the "x" in an area that doesn't draw the conclusion.
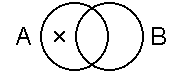
Consider this example:
no P is B
some C is B
∴ some C is not P
Valid |
 |
Here we'd first draw "no P is B," by shading the areas where circles P and B overlap. Then we'd draw "some C is B" by putting an "x" in the only unshaded area where circles C and B overlap. Once we do this, we've automatically drawn the conclusion – since we've put an "x" in a part of C that is outside P. So the argument is valid – since drawing the premises automatically draws the conclusion.
Idiomatic Arguments
When people argue in contorted ways, we have to reformulate their reasoning more clearly before we can test for validity. When you deal with such idiomatic arguments, first pick out the conclusion (what is being argued for – often indicated by words like "hence," "thus," "so," "therefore," "must," or "can't") and the premises (what is being argued from – often indicated by words like "since," "for," and "because"). Translate the premises and conclusion into logic. If some letters occur only once, you may need to add unstated but implicit premises; using the "principle of charity," interpret unclear reasoning in the way that gives the best argument. Finally, test for validity.
Here's an idiomatic argument:
Whatever is good in itself ought to be desired. But
whatever ought to be desired is capable of being
desired. So only pleasure is good in itself, since
only pleasure is capable of being desired. |
Here the conclusion is "Only pleasure is good in itself" – which goes into logic as "all G is P" ("All that is good in itself is pleasure"). If we formulate the rest of the argument and then apply the star test, we see that the argument is valid:
all G* is O Valid
all O* is C
all C* is P
∴ all G is P* |
Set F - Inference Rules
S-Rules
S-rules simplify statements. The most important S-rules are
AND,
NOR, and
NIF:
AND
|
(P • Q)
P, Q |
"AND state-
ment so both
parts are true." |
NOR
|
∼(P ∨ Q)
∼P, ∼Q |
"NOT-EITHER
is true, so both
parts are false." |
NIF
|
∼(P ⊃ Q)
P, ∼Q |
"FALSE IF-THEN,
so first part true,
second part false." |
These work even if the individual parts are negative:
I'm not in Paris and I'm not in Quebec.
∴ I'm not in Paris.
∴ I'm not in Quebec. |
(∼P • ∼Q)
∼P, ∼Q |
But they don't work if we negate the whole formula differently:
You're not both in Paris and also in Quebec.
∴ ???
∴ ??? |
∼(P • Q)
nil |
You can't be in both cities at the same time. But you might be in Paris (and not Quebec), or in Quebec (and not Paris), or in some third place. From "∼(P • Q)" we can't tell the truth value for P or for Q; we only know that not both are true (at least one is false).
This chart shows forms we CAN SIMPLIFY and forms we CAN'T SIMPLIFY:
|
CAN SIMPLIFY: | (P • Q) | ∼(P ∨ Q) | ∼(P ⊃ Q) |
|
CAN'T SIMPLIFY: | ∼(P • Q) | (P ∨ Q) | (P ⊃ Q) |
The S-rules are tricky and you need to learn them to do formal proofs. I suggest that you practice set F a few minutes a day until you get almost every problem right.
I-Rules
I-rules infer a conclusion from two premises. The three I-rules are
NOT-BOTH,
OR, and
IF-THEN:
|
NOT-BOTH |
∼(P • Q)
P
∼Q
affirm
|
∼(P • Q)
Q
∼P
one part
|
"NOT-BOTH are
true, this one is, so
the other one isn't." |
|
OR |
(P ∨ Q)
∼P
Q
deny
|
(P ∨ Q)
∼Q
P
one part
|
"At least one is
true, this one isn't,
so the other one is." |
|
IF-THEN
|
(P ⊃ Q)
P
Q
affirm first or
|
(P ⊃ Q)
∼Q
∼P
deny second
|
"IF-THEN, affirm the first,
so affirm the second."
"IF-THEN, deny the second,
so deny the first." |
For example, we can infer this way:
You're not both in Paris and also in Quebec.
You're in Paris.
∴ You're not in Quebec. |
∼(P • Q)
P
∼Q |
We can't infer this next way (since the NOT-BOTH form requires that we AFFIRM one part – and since you might be in Chicago instead):
You're not both in Paris and also in Quebec.
You're not in Paris.
∴ You're in Quebec. |
∼(P • Q)
∼P
Q |
But this next one is valid; the second premise "∼A" affirms one part since it says the same thing:
The most important I-rules are the last two (called
IF-THEN, or
modus ponens /
modus tollens):
If-then.
Affirm first.
∴ Affirm second. |
(P ⊃ Q)
P
Q |
If-then.
Deny second.
∴ Deny first. |
(P ⊃ Q)
∼Q
∼P |
To infer with an if-then, we must
affirm the first part or
deny the second part. These two examples are valid:
If you're a dog, you're an animal.
You're a dog.
∴ You're an animal. |
(D ⊃ A)
D
A |
If you're a dog, you're an animal.
You're not an animal.
∴ You're not a dog. |
(D ⊃ A)
∼A
∼D |
However, these two are invalid, where we
deny the first part or
affirm the second part, since you might be a cat-type animal instead:
If you're a dog, you're an animal.
You're not a dog.
∴ You're not an animal. |
(D ⊃ A)
∼D
∼A |
If you're a dog, you're an animal.
You're an animal.
∴ You're a dog. |
(D ⊃ A)
A
D |
To "affirm" a part means to say the same thing, and to "deny" a part means to say the opposite. So in this example – which is valid – we correctly deny the second part of the if-then and conclude the denial of the first part:
When we start to do formal proofs, we'll often use the S- and I-rules on larger formulas. Suppose that we have this premise: "((A • B) ⊃ (C ∨ D))." We can infer with this if we have the first part true; then we can conclude that the second part is true:
((A • B) ⊃ (C ∨ D))
(A • B)
(C ∨ D) |
Likewise, we can infer if we have the second part false; then we can conclude that the first part is false:
((A • B) ⊃ (C ∨ D))
∼(C ∨ D)
∼(A • B) |
The I-rules are tricky and you need to learn them to do formal proofs. I suggest that you practice set F a few minutes a day until you get almost every problem right.
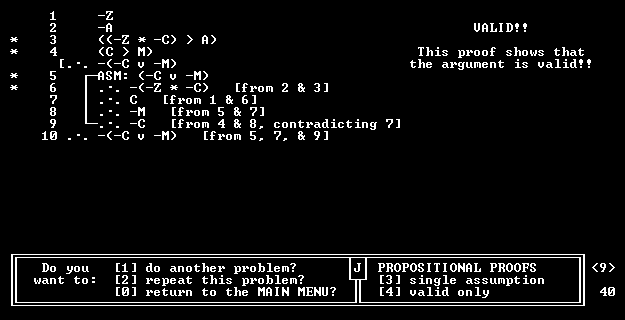
Set G - Propositional Proofs
Doing Proofs in LogiCola
A LogiCola proof problem begins like this:
1 (S ⊃ ∼C)
2 (S ∨ ∼A)
[∴ ∼(A • C)
What's next, Harry? _
TO ANSWER: Type a derived line ("A"), assumption
("ASM: A"), or "REFUTE" (to finish an invalid argument).
Click a wff (or use PgUp-PgDn keys) to copy it to the
answer space. "Info" reviews the rules.
|
You type formulas until the proof is completed. First assume the opposite of the conclusion by typing
"ASM: (A • C)." LogiCola will accept this answer, add it to the proof, and ask for the next line.
LogiCola rejects lines that are poor strategy or violate the inference rules. Then you get the "Sorry, I don't like your answer" message and have to try again. On your first error, you get a hint about what to do next; on your second, you're told what answer to give. For some typing errors, such as not balancing parentheses, you're given a hint but don't lose points.
You could complete the proof this way:
* 1 (S ⊃ ∼C)
* 2 (S ∨ ∼A)
[∴ ∼(A • C)
* 3 ┌ asm: (A • C)
4 │ ∴ A {from 3}
5 │ ∴ C {from 3}
6 │ ∴ ∼S {from 1 and 5}
7 └ ∴ ∼A {from 2 and 6}
8 ∴ ∼(A • C) {from 3; 4 contradicts 7} |
Here
you type
ASM: (A • C)
A
C
∼S
∼A
∼(A • C)
|
You keep typing the next formula. Don't type line numbers, justifications, "∴" for "therefore," or stars; LogiCola types these for you. To derive a formula from previous lines, just type the formula and hit ENTER. You could do this sample proof in various other ways; for example, you could derive "S" in lines 6 or 7. LogiCola accepts any way to do the proof that accords with our normal strategy.
You can click a previous formula to put it into the answer space. So instead of typing "ASM: (A • C)" to begin the proof, you can click the original conclusion, which puts "∼(A • C)" into the answer space, and then replace "∼" with "ASM:"; as formulas get longer, this clicking technique can save you time and minimize typing errors.
With invalid arguments, do the proof as far as you can and then type "REFUTE." LogiCola uses the lines you've derived to construct a refutation – truth conditions making premises all true and conclusion false.
If you get confused on what to do, you can click GETANS ("Get answer") to have LogiCola give you the next line. You normally lose points for this; but if LogiCola just rejected your answer, you won't lose further points.
Proof exercises have two special settings:
- STARRING: Normally use the "program stars" setting. To make sure you understand how to star, you might occasionally use "you star," which keeps asking you about which lines get starred; you don't lose points for mistakes about starring.
- TRAINING WHEELS (like when you learn to ride a bicycle): If you have this "on," you get hints about what line to derive next -- and the lines to derive from are bolded; the hints cease when you reach 15 points and the bolding ceases when you reach 30 points. (Note that the hints give ONE way to do the proof, but not necessarily the only way.)
These two settings don't impact how your exercise is scores; so you get credit for the "GEV" exercise, for example, regardless of how these settings are set.
Here are two more things. (1) You needn't capitalize correctly in proof exercises (as opposed to translation exercises); the program will correct for capitalization errors in proof exercises. (2) If you are running out of screen space, the program will finish the proof for you.
Basic Formal Proofs
For propositional proofs, we'll use these inference rules, which hold regardless of what pairs of contradictory wffs replace "P" / "∼P" and "Q" / "∼Q" (here "⇒" means we can infer whole lines from left to right):
| S-rules (Simplifying) |
I-rules (Inferring) |
(P • Q) ⇒ P, Q
∼(P ∨ Q) ⇒ ∼P, ∼Q
∼(P ⊃ Q) ⇒ P, ∼Q
∼∼P ⇒ P
(P ≡ Q) ⇒ (P ⊃ Q), (Q ⊃ P)
∼(P ≡ Q) ⇒ (P ∨ Q), ∼(P • Q) |
∼(P • Q), P ⇒ ∼Q
∼(P • Q), Q ⇒ ∼P
(P ∨ Q), ∼P ⇒ Q
(P ∨ Q), ∼Q ⇒ P
(P ⊃ Q), P ⇒ Q
(P ⊃ Q), ∼Q ⇒ ∼P |
We'll do "indirect proofs," where we assume the opposite of what we want to prove and then derive a contradiction; then the original conclusion follows. This style of proof uses RAA (which stands for "reductio ad absurdum" – reduction to absurdity):
RAA: Suppose that some pair of not-blocked-off lines has contradictory wffs. Then block off all the lines from the last not-blocked-off assumption on down and infer a line consisting in "∴" followed by a contradictory of that assumption.
Our proof system is characterized by these definitions:
- A premise is a line consisting of a wff by itself (with no "∴" or "asm:").
- An assumption is a line consisting of "asm:" and then a wff.
- A derived line is a line consisting of "∴" and then a wff.
- A formal proof is a vertical sequence of zero or more premises followed by one or more assumptions or derived lines, where each derived line follows from previously not-blocked-off lines by one of the S- and I-rules listed above or by RAA, and each assumption is blocked off using RAA.
- Two wffs are contradictories if they are exactly alike except that one starts with an additional "∼."
- A simple wff is a letter or its negation; any other wff is complex.
A provisional form of our proof strategy goes as follows (here starring a line indicates that you can ignore it for the rest of the proof):
- START: Block off the conclusion and add "asm:" followed by the conclusion's simpler contradictory.
- S&I: Go through the complex wffs that aren't starred or blocked off and use these to derive new wffs using S- and I-rules. Star any wff you simplify using an S-rule, or the longer wff used in an I-rule inference.
- RAA: When some pair of not-blocked-off lines contradict, apply RAA and derive the original conclusion. Your proof is done.
Here's a very simple proof:
* 1 (A ⊃ B) Valid
[∴ (∼A ∨ B)
* 2 ┌ asm: ∼(∼A ∨ B)
3 │ ∴ A {from 2}
4 │ ∴ ∼B {from 2}
5 └ ∴ B {from 1 and 3}
6 ∴ (∼A ∨ B) {from 2; 4 contradicts 5} |
We begin by assuming the opposite of the conclusion (line 2). We derive further lines using the S- and I-rules until we get a contradiction (lines 3 to 5). Finally, we apply RAA to complete the proof (line 6).
Invalid Arguments
If you attempt to prove an invalid argument, you won't succeed; instead, you'll get a refutation. A
refutation is a set of truth conditions (assignments of "1" and "0" to the letters) that makes premises all true and conclusion false. A refutation shows the argument to be invalid, just as a proof shows the argument to be valid. So now we'll try to prove valid arguments (by giving proofs) – and refute invalid arguments (by giving refutations).
A still provisional form of our proof strategy goes as follows:
- START: Block off the conclusion and add "asm:" followed by the conclusion's simpler contradictory.
- S&I: Go through the complex wffs that aren't starred or blocked off and use these to derive new wffs using S- and I-rules. Star any wff you simplify using an S-rule, or the longer wff used in an I-rule inference. If you get a contradiction, apply RAA (line 3). If you can derive nothing further and yet have no contradiction, then refute (line 4).
- RAA: Since you have a contradiction, apply RAA. You've proved the argument valid.
- REFUTE: You have no contradiction and yet can't derive anything else. Draw a box containing any simple wffs (letters or their negation) that aren't blocked off. In the original argument, mark each letter "1" or "0" or "?" depending on whether you have the letter or its negation or neither in the box. If these truth conditions make the premises all true and conclusion false, then this shows the argument to be invalid.
While this strategy works most of the time, we'll see later that some propositional arguments require a more powerful strategy for getting a proof or refutation.
Here's how this strategy applies to a very simple argument:
1 (Aº ⊃ B¹) = 1
[∴ (B¹ ⊃ Aº) = 0
* 2 asm: ∼(B ⊃ A)
3 ∴ B {from 2}
4 ∴ ∼A {from 2}
|
Invalid
B, ∼A |
We begin by assuming the opposite of the conclusion (line 2). We derive all we can using the S- and I-rules (lines 3 and 4). Since we get no contradiction, we instead collect the simple wffs to get a refutation (in the right-hand box). We also could write the refutation box this way:
So we make B true and A false and check that this makes premises all true and conclusion false. Since it does, the argument is shown to be invalid.
If our refutation doesn't work, then we did something wrong. The line that comes out wrong (a premise that's 0 or ?, or a conclusion that's 1 or ?) is the source of the problem; we did something wrong with it – either deriving something wrongly or else not deriving something that we should have derived. So plugging in the values can help us to find errors.
Multiple-Assumption Arguments
Some arguments require further assumptions. You make a further assumption when you get stuck. Here's the final form of our propositional proof strategy (here a complex wff is "broken" if we have one side or its negation as a not-blocked-off line in the proof):
- START: Block off the conclusion and add "asm:" followed by the conclusion's simpler contradictory.
- S&I: Go through the complex wffs that aren't starred or blocked off and use these to derive new wffs using S- and I-rules. Star (with one star for each live assumption) any wff you simplify using an S-rule, or the longer wff used in an I-rule inference. If you get a contradiction, then go to RAA (line 3). If you can't derive anything further but there is a complex wff that isn't starred or blocked off or broken, then go to ASSUME (line 4). If you can't derive anything further and every complex wff is starred or blocked off or broken, then go to REFUTE (line 5).
- RAA: Apply the RAA rule. If all assumptions are now blocked off, you've proved the argument valid. Otherwise, erase star strings having more stars than the number of live assumptions and return to line 2.
- ASSUME: Pick a complex wff that isn't starred or blocked off or broken. This wff will have one of these forms: "∼(A • B)," "(A ∨ B)," or "(A ⊃ B)." Assume one side or its negation and return to line 2.
- REFUTE: Construct a refutation box. Put into the box any simple wffs (letters or their negation) that aren't blocked off. In the original argument, mark each letter "1" or "0" or "?" depending on whether the box has the letter or its negation or neither. These truth conditions should make the premises all true and conclusion false – thus showing the argument to be invalid.
Correctly applied, our revised procedure will always generate a proof or a refutation. Here's a multiple-assumption proof:
* 1 (B ∨ A) Valid
2 (B ⊃ A)
[∴ ∼(A ⊃ ∼A)
* 3 ┌ asm: (A ⊃ ∼A)
4 │┌ asm: B {break 1}
5 ││ ∴ A {from 2 and 4}
6 │└ ∴ ∼A {from 3 and 5}
7 │ ∴ ∼B {from 4; 5 contradicts 6}
8 │ ∴ A {from 1 and 7}
9 └ ∴ ∼A {from 3 and 8}
10 ∴ ∼(A ⊃ ∼A) {from 3; 8 contradicts 9} |
We begin by assuming the opposite of the conclusion (line 3). Since we can't derive anything else, we make another assumption (line 4). We derive further lines using the S- and I-rules until we get a contradiction (lines 5 and 6). Then we kill the previous assumption and derive the opposite (line 7). We derive further lines using the S- and I-rules until we get a second contradiction (lines 8 and 9). Finally, we apply RAA to complete the proof (line 10).
When we apply RAA on an assumption, we block off the lines from the assumption on down – showing that we can't use these lines in deriving further lines or in getting a contradiction. In the above proof, after we block off lines 4 to 6 we can't use them any more; their only function was to give us line 7.
This invalid argument uses multiple assumptions:
1 (A¹ ∨ ∼(B ⊃ C¹)) = 1
2 (Dº ⊃ (A¹ ⊃ B)) = 1
[∴ (C¹ ⊃ ∼(Dº ∨ A¹)) = 0
* 3 asm: ∼(C ⊃ ∼(D ∨ A))
4 ∴ C {from 3}
5 ∴ (D ∨ A) {from 3}
6 asm: A {break 1}
7 asm: ∴ ∼D {break 2} |
Invalid
C, A, ∼D |
We begin by assuming the opposite of the conclusion (line 3). We derive lines 4 and 5, but get no contradiction. Since we can't derive anything else, we make another assumption (line 6). Since we still can't derive anything else, we make a third assumption (line 7). At this point, we could use line 5 with 7 to derive "A" – but we already have this in line 6, so we don't do it. Also, we don't make another assumption on line 5, since we don't make an assumption on a wff if we already have one side or its negation. So, being unable to derive or assume anything else, we collect the simple wffs to get a refutation. We check that having C and A true and D false makes premises all true and conclusion false. Since it does, the argument is shown to be invalid.
With our full proof strategy, we keep going until one of these things happens:
- Every assumption leads to a contradiction. Then we have a proof of validity.
- We can't derive anything further (using S- or I-rules or RAA) and every complex wff is starred or blocked off or broken. (A complex wff is "broken" if we have one side or its negation as a not-blocked-off line in the proof.) Then the remaining simple wffs will give a refutation that proves invalidity.
In the second case, we sometimes end by making several assumptions that help to give us our refutation. Invalid arguments frequently require three or more assumptions.
Copi Proofs
Copi proofs are a traditional way of doing proofs (see section 7.5 of the third edition of Gensler's logic book). To do these in set G, pick "Copi Proofs" and the level of difficulty (Easier / Harder / Mixed); you get the same randomly generated problems (but only valid ones) as with our regular proofs. You repeatedly type the next wff, click (or touch) the inference rule, and then click (or touch) the previous wffs from which your step follows. There are no arrows to get the next line or finish the problem; but you can quit the problem (which costs you points) or paste your own problems (or ones from your teacher). You can also copy previous lines or the conclusion into the answer space, so you can modify them to give your next line. While Copi proofs are difficult, youll soon get the hang of it.
Truth Trees
Truth treees are a common graphical method of testing arguments (see section 7.6 of the third edition of Gensler's logic book); truth trees break formulas into the cases that make them true. To do these in set G, pick Treez and the level of difficulty (Easier / Harder / Mixed); you get the same randomly generated problems (valid and invalid) as with regular proofs. You do this exercise entirely by clicking or touching (no typing); follow the directions at the bottom. The "program closes branches" option automatically closes self-contradictory branches, while "you close branches" has you close these yourself (but without losing points for errors). The "automatic double-negation" option simplifies double negations automatically (so ∼(A ∨ ∼B) simplifies into ∼A and B instead of ∼A and ∼∼B). You can click or touch an arrow at the top to give you the next line or finish the problem (but without getting credit for the problem); you can use these to step through sample proofs before starting them on your own.
Set H - Quantificational Translations
Easier Translations
Quantificational logic studies arguments whose validity depends on "all," "no," "some," and similar notions. It builds on propositional logic and adds two new vocabulary items: small letters and "∃":
|
Ir | = |
Romeo is Italian. |
|
Ix | = |
x is Italian. |
|
(x)Ix | = |
All are Italian.
For all x, x is Italian. |
|
(∃x)Ix | = |
Some are Italian.
For some x, x is Italian. |
Capital letters and small letters have various uses:
- A capital letter alone (not followed by small letters) represents a statement (so "S" = "It is snowing"). A capital letter followed by a single small letter represents a general term (so "Ir" = "Romeo is Italian").
- A small letter from "a" to "w" is a constant – and stands for a specific person or thing (so "r" might stand for Romeo). A small letter from "x" to "z" is a variable – and stands for an unspecified person or thing (so "Ix" = "x is Italian" – with "x" serving as a variable).
A
quantifier is a sequence of the form "(x)" or "(∃x)" – where any other variable may replace "x":
- "(x)" is a universal quantifier. It claims that the formula that follows is true for all values of x. So "(x)Ix" = "All are Italian" = "For all x, x is Italian."
- "(∃x)" is an existential quantifier. It claims that the formula that follows is true for at least one value of x. So "(∃x)Ix" = "Some are Italian" = "For some x, x is Italian."
We have two new ways to form
wffs, in addition to those used in propositional logic:
- The result of writing a capital letter and then a small letter is a wff.
- The result of writing a quantifier and then a wff is a wff.
We'll begin with easier translations – with English sentences that translate into wffs starting with a quantifier, or with "∼" and then a quantifier. This rule tells where to put what quantifier:
| If the English begins with |
then begin the wff with |
all (every)
not all (not every)
some
no |
(x)
∼(x)
(∃x)
∼(∃x) |
Here are examples:
|
Everyone is Italian | = |
(x)Ix |
|
Not all are Italian | = |
∼(x)Ix |
|
Some are Italian | = |
(∃x)Ix |
|
No one is Italian | = |
∼(∃x)Ix |
If the English sentence uses "or," "and," or "if-then," then use the corresponding logical connective; so "All are Germans or Italians" is "(x)(Gx ∨ Ix)." When the English doesn't specify the connective, use these rules:
With "all ... is ...,"
use "⊃" for the
middle connective. |
Otherwise use
"•" for the
connective. |
Here are examples:
All Italians are lovers = (x)(Ix ⊃ Lx)
(For all x, if x is Italian then x is a lover.)
|
Some Italians are lovers = (∃x)(Ix • Lx)
(For some x, x is Italian and x is a lover.)
|
No Italians are lovers = ∼(∃x)(Ix • Lx)
(It is not the case that, for some x, x is Italian and x is a lover.)
|
All rich Italians are lovers = (x)((Rx • Ix) ⊃ Lx)
(For all x, if x is rich and x is Italian, then x is a lover.)
|
In the last example, "⊃" comes from the "middle connective" rule ("
if rich Italian
then lover") and "•" from the "otherwise" rule ("if rich
and Italian then lover").
Harder Translations
Harder translations use some of these additional features:
- Capital letters alone (not followed by small letters) represent whole statements – like "S" for "It's snowing."
- Small letters from "a" to "w" represent singular terms (terms that stand for a specific person or thing) – like "r" for "Romeo" or "p" for "the current president."
- Some formulas use two or more quantifiers, or quantifiers that are not near the beginning of the formula.
Here's a long formula that uses all these features:
If all Greeks are mortal and Socrates is Greek,
then someone is mortal and it will rain
=
(((x)(Gx ⊃ Mx) • Gs) ⊃ ((∃x)Mx • R))
|
We need to expand our rule about where to put quantifiers to this:
| Wherever the English has |
put this in the wff |
all (every)
not all (not every)
some
no |
(x)
∼(x)
(∃x)
∼(∃x) |
Here are examples:
If all are Italians, then not all are Germans
((x)Ix ⊃ ∼(x)Gx)
|
Either some are Italians or no one is Italian
((∃x)Ix ∨ ∼(∃x)Ix)
|
Use a separate quantifier for each "all," "some," and "no." And mimic the English word order:
not all = ∼(x)
all not = (x)∼ |
all either = (x)(
either all = ((x) |
"Any" is an exception and is governed by two different but equivalent rules:
- To translate "any," put a "(x)" at the beginning of the wff, regardless of where the "any" occurs in the sentence.
- To translate "any," first rephrase the sentence so it means the same thing but doesn't use "any"; then translate the second sentence.
These two methods often give different, but equivalent, translations. It's good to know both methods, because sometimes one is easier to apply. Here are examples of translations using these two methods:
Not anyone is rich = No one is rich
(x)∼Rx = ∼(∃x)Rx
|
If anyone is just, there will be peace = If some are just, ...
(x)(Jx ⊃ P) = ((∃x)Jx ⊃ P)
|
Not any Italians are lovers = No Italians are lovers
(x)∼(Ix • Lx) = ∼(∃x)(Ix • Lx)
|
Our translation rules are rough and sometimes can give a wrong translation. After you translate from English, read your formula over carefully to make sure it means the same as the original sentence.
Identity Translations
Identity logic adds to quantificational logic the "=" symbol and this formation rule:
- The result of writing a small letter and then "=" and then a small letter is a wff.
Compare these two:
| Romeo is a lover |
Lr |
Predication |
| Romeo is the lover of Juliet |
r=l |
Identity |
Use small letters for singular terms (terms that stand for a specific person or thing – like "Romeo" or "the lover of Juliet"); use capital letters for general terms (terms that do or could describe more than one person or thing – like "Italian" or "a lover"). Use "=" to link small letters. "a=b" is equivalent to "b=a" and to "a is the same entity as b." Here are further translations involving identity:
Romeo isn't the lover of Juliet
∼r=l |
Someone besides (who isn't) Romeo is rich
(∃x)(∼x=r • Rx) |
Romeo alone is rich
(Romeo is rich and no one besides Romeo is rich)
(Rr • ∼(∃x)(∼x=r • Rx)) |
We can translate some numerical notions using identity:
There is exactly one Italian
(∃x)(Ix • ∼(∃y)(∼y=x • Iy)) |
There are at least two Italians
(∃x)(∃y)(∼x=y • (Ix • Iy)) |
There are exactly two Italians
(∃x)(∃y)((∼x=y • (Ix • Iy)) • ∼(∃z)((∼z=x • ∼z=y) • Iz)) |
Relational Translations
Relational logic adds to quantificational logic this formation rule:
- The result of writing a capital letter and then two or more small letters is a wff.
A capital letter followed by two or more small letters stands for a relation. So "Lxy" might mean "x loves y" – and "Gxyz" might mean "x gave y to x." Relational translations are difficult, with few rules to help you. Here are some examples without quantifiers:
Romeo loves Juliet
Lrj |
Juliet loves Romeo
Ljr |
Juliet loves herself
Ljj |
Juliet loves Romeo and Antonio
(Ljr • Lja) |
These examples have a single quantifier:
Everyone loves Juliet
(x)Lxj |
Someone loves Juliet
(∃x)Lx |
No one loves Juliet
∼(∃x)Lxj |
If English puts a quantifier word
after the relation, then logic puts the quantifier
before the relation. So "Juliet loves everyone (someone, no one)" means "For all (some, no) x, Juliet loves x":
Juliet loves everyone
(x)Ljx |
Juliet loves someone
(∃x)Ljx |
Juliet loves no one
∼(∃x)Ljx |
Juliet loves every Italian
(x)(Ix ⊃ Ljx) |
Juliet loves some Italian
(∃x)(Ix • Ljx) |
Juliet loves no Italian
∼(∃x)(Ix • Ljx) |
These examples have two quantifiers:
Everyone loves everyone
(x)(y)Lxy |
Someone loves someone
(∃x)(∃y)Lxy |
Everyone loves everyone else
(x)(y)(∼x=y ⊃ Lxy) |
Someone loves someone else
(∃x)(∃y)(∼x=y • Lxy) |
The last two are importantly different – but often confused:
Everyone loves someone or other
(x)(∃y)Lxy |
There is someone that everyone loves
(∃y)(x)Lxy |
In the first case, everyone might love a different person. In the second case, there is some one person that everyone loves.
These examples are harder:
Every Italian loves some German or other
(x)(Ix ⊃ (∃y)(Gy • Lxy)) |
It's always the case that if a first person understands
a second then the first loves the second
(x)(y)(Uxy ⊃ Lxy) |
Romeo loves all and only those who don't love themselves
(x)(Lrx ≡ ∼Lxx) |
There is an unloved lover
(∃x)(∼(∃y)Lyx • (∃z)Lxz) |
Set I - Quantificational Proofs
Easier Proofs
Quantificational proofs work like propositional proofs, but add these four inference rules (where "Fx" can be any wff using a given variable, while "Fa" is similar except that the same constant replaces each occurrence of this variable):
| Reverse squiggles |
∼(x)Fx ⇒ (∃x)∼Fx
∼(∃x)Fx ⇒ (x)∼Fx |
| Drop existentials |
(∃x)Fx ⇒ Fa,
use a new constant |
| Drop universals |
(x)Fx ⇒ Fa,
use any constant |
A constant letter is
old if it already occurs in the argument; otherwise it's
new.
Our proof strategy still uses START, S&I, RAA, ASSUME and REFUTE. It adds these to the S&I part:
- First reverse squiggles: For each unstarred, not-blocked-off line that begins with "∼" and then a quantifier, derive a line using the reverse-squiggle rules. Star the original line.
- And drop existentials: For each unstarred, not-blocked-off line that begins with an existential quantifier, derive an instance using the next available new constant (unless some such instance already occurs in previous not-blocked-off lines lines). Star the original line.
- Lastly drop universals: For each not-blocked-off line that begins with a universal quantifier, derive instances using each old constant. Don't star the original line; you might have to use it again. Note: Drop a universal using a not-blocked-off linesnew letter only if you've done everything else possible (making further assumptions if needed) and still have no old letters; this is unusual, but happens if we try to prove "(x)∼Fx ∴ ∼(x)Fx."
Here's the general strategy:
START
S&I + new quantificational rules
RAA
ASSUME
REFUTE |
Here's a quantificational proof:
* 1 (∃x)(Fx • Gx) Valid
[∴ (∃x)Fx
* 2 ┌ asm: ∼(∃x)Fx
3 │ ∴ (x)∼Fx {from 2}
4 │ ∴ (Fa • Ga) {from 1}
5 │ ∴ ∼Fa {from 3}
6 └ ∴ Fa {from 4}
7 ∴ (∃x)Fx {from 2; 5 contradicts 6} |
We begin by assuming the opposite of the conclusion (line 2). We use the reverse-squiggle rules on 2 to get 3, drop "(∃x)" in 1 using a new letter "a" to get 4, and drop "(x)" in 3 using the old letter "a" to get 5. We derive line 6 using the S- and I-rules. Finally, we apply RAA to complete the proof (line 7).
Invalid Arguments
If we attempt to prove an invalid argument, we'll instead be led to a
refutation – a little possible world with various individuals (like
a and
b) and various simple truths about these individuals (like
Fa and
∼Fb) – a possible world that would make premises all true and conclusion false. Evaluate each wff that starts with a quantifier as follows:
A universal wff is true if and only if
all cases are true. |
An existential wff is true if and only if
at least one case is true. |
As before, be sure to check that your refutation works. If you don't get premises all 1 and conclusion 0, then you did something wrong – and you should check out what you did with the formula that didn't come out right.
Here's an invalid quantificational argument:
1 (x)(Fx ⊃ Gx) = 1
* 2 (∃x)Fx = 1
[∴ (x)Gx = 0
* 3 asm: ∼(x)Gx
* 4 ∴ (∃x)∼Gx {from 3}
5 ∴ ∼Ga {from 4}
6 ∴ Fb {from 2}
* 7 ∴ (Fa ⊃ Ga) {from 1}
* 8 ∴ (Fb ⊃ Gb) {from 1}
9 ∴ ∼Fa {from 5 and 7}
10 ∴ Gb {from 6 and 8} |
Invalid
a, b
∼Fa, ∼Ga
Fb, Gb |
We begin by assuming the opposite of the conclusion (line 3). We first reverse squiggles (line 4). We drop each "(∃x)" with a new letter, using "a" the first time and "b" the second (lines 5 and 6). We drop the "(x)" from line 1 once for each old letter (lines 7 and 8). We derive a few more things using the S- and I-rules (lines 9 and 10). Since we get no contradiction, we instead collect the simple wffs to get a refutation, as on the right above. Our little world has two entities,
a and
b. In this world, the first premise
"(x)(Fx ⊃ Gx)" is true, since each instance is true:
(Fa ⊃ Ga) = (0 ⊃ 0) = 1
(Fb ⊃ Gb) = (1 ⊃ 1) = 1
The second premise "(∃x)Fx" is true, since at least one instance is true (namely "Fb"). The conclusion "(x)Gx" is false, since at least one instance is false (since "Ga" is false). Since our refutation makes premises all true and conclusion false, the argument is shown to be invalid.
Harder Arguments
Proofs using multiple or non-initial quantifiers follow the same inference rules as before but often are less mechanical and require multiple assumptions. Remember to drop only initial quantifiers; so we should treat a wff like
"((x)Fx ⊃ (x)Gx)" as an if-then, and use only the propositional rules on it (including making another assumption if needed). Here's an example:
1 ((x)Fx ⊃ (x)Gx) = 1
[∴ (Fa ⊃ Ga) = 0
* 2 asm: ∼(Fa ⊃ Ga)
3 ∴ Fa {from 2}
4 ∴ ∼Ga {from 2}
5 asm: ∼(x)Fx {break 1}
** 6 ∴ (∃x)∼Fx {from 5}
** 7 ∴ ∼Fb {from 6} |
Invalid
a,b
Fa, ∼Ga
∼Fb |
We begin by assuming the opposite of the conclusion (line 2). We apply an S-rule to the assumption (lines 3 and 4). Since we're stuck, we make another assumption (line 5). We reverse squiggles (line 6) and drop the "(∃x)" with the new letter "b" (line 7). Since we get no contradiction, we instead collect the simple wffs to get a refutation, as on the right above. This little world has two entities,
a and
b. In evaluating a wff like "((x)Fx ⊃ (x)Gx)," evaluate each part starting with a quantifier separately and then put the pieces together. So:
"(x)Fx" is false, since "Fb" is false
"(x)Gx" is false, since "Ga" is false
So "((x)Fx ⊃ (x)Gx)" = (0 ⊃ 0) = 1
So the first premise is true. The conclusion is false, since the first part is true and the second false. Since our refutation makes premises all true and conclusion false, the argument is shown to be invalid.
Identity Arguments
Identity logic adds two new inference rules:
| Self-identity |
a=a |
| Equals may substitute for equals |
a=b, Fa ⇒ Fb |
In the first rule, any constant can substitute for "a"; you can add a self-identity anywhere, regardless of earlier lines. Adding "a=a" can be useful if this gives us a contradiction (in case we already have "∼a=a") or lets us apply an I-rule (in case we already have something like
"(a=a ⊃ Gb)"). In the second rule, any constants can replace "a" and "b" and any wffs can replace "Fa" and "Fb" – provided that the two wffs are alike except that the two constants are switched in one or more occurrences. Here's an identity proof:
* 1 (∃x)(∃y)∼x=y Valid
[∴ ∼(∃x)(y)y=x
* 2 ┌ asm: (∃x)(y)y=x
* 3 │ ∴ (∃y)∼a=y {from 1}
4 │ ∴ ∼a=b {from 3}
5 │ ∴ (y)y=c {from 2}
6 │ ∴ a=c {from 5}
7 │ ∴ b=c {from 5}
8 └ ∴ a=b {from 6 and 7}
9 ∴ ∼(∃x)(y)y=x {from 2; 4 contradicts 8} |
We begin by assuming the opposite of the conclusion (line 2). We drop each initial "(∃x)" with a new letter, using "a" and then "b" and then "c" (lines 3 to 5). We drop the "(y)" in line 5 once for each old letter (lines 6 and 7) – except "c," which won't help us. We then take 6 and replace "c" with "b," which 7 claims to be identical (line 8). Finally, we apply RAA to complete the proof (line 9).
Relational Arguments
Relational proofs follow the same inference rules but bring in some new wrinkles.
Relational formulas often use back-to-back quantifiers – as in
"(x)(y)(Lxy ⊃ Lyx)." Since we can drop only an initial quantifier, we have to drop these one at a time, working from the outside. If we have several constants at this point, it may be impractical to drop each universal quantifier using all old constants; so we'll often deviate from our normal proof strategy and just plug in the constants most likely to help us to prove or refute the argument.
Also, our proof strategy sometimes leads into an endless loop. When you see this coming, stop the proof and figure out a refutation. Here's an example:
(x)(∃y)Lxy
∴ (∃y)(x)Lxy |
Everyone loves someone or other.
∴ There is someone that everyone loves. |
Here's what happens when we apply our proof strategy mechanically to the first premise:
(x)(∃y)Lxy
∴ (∃y)Lay
∴ Lab
∴ (∃y)Lby
∴ Lbc
∴ (∃y)Lcy ... |
Everyone loves someone or other.
∴ a loves someone or other.
∴ a loves b.
∴ b loves someone or other.
∴ b loves c.
∴ c loves someone or other. ... |
You can usually stop before introducing your third constant. You have to figure out the refutation for yourself; try using the formulas that you've derived that contain the first two constants – and then add any further formulas that you need to make premises all true and conclusion false. This refutation works for our example:
(x)(∃y)Lxy = 1
∴ (∃y)(x)Lxy = 0
|
Invalid
a,b
Lab, Lba
∼Laa, ∼Lbb |
In this little world, everyone loves someone or other (since
a loves someone and
b loves someone) – but it is false that there is someone that everyone loves (since not everyone loves
a and not everyone loves
b). Since our refutation makes premises all true and conclusion false, the argument is shown to be invalid.
Here's a relational proof:
1 (x)(y)Lxy Valid
[∴ (∃x)Lax
* 2 ┌ asm: ∼(∃x)Lax
3 │ ∴ (x)∼Lax {from 2}
4 │ ∴ ∼Laa {from 3}
5 │ ∴ (y)Lay {from 1}
6 └ ∴ Laa {from 5}
7 ∴ (∃x)Lax {from 2; 4 contradicts 6} |
We begin by assuming the opposite of the conclusion (line 2). We reverse squiggles (line 3). We keep dropping initial universal quantifiers using the old letter "a" (lines 4 to 6). Finally, we apply RAA to complete the proof (line 7).
Set J - Modal Translations
Basic Translations
Modal logic studies arguments whose validity depends on "necessary," "possible," and similar notions. It builds on propositional logic and thus includes all the vocabulary, wffs, inference rules, and proofs of the latter. In the next section, we'll add the machinery of quantificational logic.
Modal logic adds two new vocabulary items: "◊" and "☐." We have one new way to form wffs, in addition to those used in PC:
- The result of writing "◊" or "☐," and then a wff, is a wff.
Compare these three:
| ◊A | = |
It's possible that A | = |
A is true in some possible world |
| A | = |
It's true that A | = |
A is true in the actual world |
| ☐A | = |
It's necessary that A | = |
A is true in all possible worlds |
Calling something possible is a weak claim – weaker than calling it true. Calling something necessary is a strong claim; it says, not just that the thing is true, but that it has to be true – it couldn't be false.
"Possible" here means logically possible (not self-contradictory). "I run a mile in two minutes" may be physically impossible; but there's no self-contradiction in the idea, so it's logically possible. Likewise, "necessary" means logically necessary (self-contradictory to deny). "2+2=4" and "If there's rain, then there's precipitation" are logically necessary; such truths are based on logic, the meaning of concepts, or necessary connections between properties.
We can paraphrase "possible" as true in some possible world – and "necessary" as true in all possible worlds. A
possible world is a consistent and complete description of how things might have been or might in fact be. Picture a possible world as a consistent story (or novel). The story is consistent, in that its statements don't entail self-contradictions; the story describes a set of possible situations that are all possible together. The story is complete, in that every possible fact or its denial is included. The story may or may not be true. The actual world is the story that's true – the description of how things in fact are.
Here are some common modal translations:
A is possible (consistent, could be true)
= ◊A |
A is necessary (must be true, has to be true)
= ☐A |
A is impossible (self-contradictory, can't be true, must be false)
= ∼◊A = ☐∼A |
| A is consistent (compatible) with B | = |
◊(A • B) |
| A entails B | = |
☐(A ⊃ B) |
| A is a contingent statement | = |
(◊A • ◊∼A) |
| A is a contingent truth | = |
(A • ◊∼A) |
Mimic the English when you translate:
not necessary = ∼☐
necessary not = ☐∼ |
necessary if = ☐(
if necessary = (☐ |
Use a separate box or diamond for each "necessary" or "possible":
If A is necessary and B is possible, then C is possible
= ((☐A • ◊B) ⊃ ◊C) |
When you see these next forms, say that they are ambiguous and translate them two ways (as both box-inside and box-outside formulas):
If A is true, then it's necessary (must be) that B
could mean "(A ⊃ ☐B)" or "☐(A ⊃ B)" |
If A is true, then it's impossible (couldn't be) that B
could mean "(A ⊃ ☐∼B)" or "☐(A ⊃ ∼B)" |
For example, this sentence could have either of the following two meanings:
"If you're a bachelor, then you must be unmarried."
- (B ⊃ ☐U) = If B, then U (by itself) is necessary = If you're a bachelor, then you're inherently unmarriable – in no possible world would anyone ever marry you. (This is insulting and presumably false.)
- ☐(B ⊃ U) = It's necessary that if B then U = It's necessary that if you're a bachelor then you're unmarried. (This is trivially true because we use "bachelor" to mean unmarried man.)
The ambiguous forms are IF-THENs with a strong modal term (like "necessary," "must," "impossible," or "can't") in the THEN part. It's not ambiguous if you say that the second part "by itself" is necessary or impossible – or if you use "entails" or start with "necessarily" or "it's necessary that."
Quantified Translations
Quantified Modal Logic adds quantificational logic (its vocabulary, wffs, inference rules, and proofs) to modal logic. Here are some translations:
It's possible for everyone to be above average
= ◊(x)Ax |
It's possible for anyone to be above average
= (x)◊Ax |
F is a necessary (essential) property of x
= x is necessarily F
= In all possible worlds, x would be F
= ☐Fx
|
F is a contingent (accidental) property of x
= x is F but could have lacked F
= x is F in the actual world but isn't F in some possible world
= (Fx • ◊∼Fx) |
The last two examples speak of necessary and contingent properties. Perhaps the number 8 necessarily has the property of being even – but contingently has the property of being my favorite number. And perhaps Socrates necessarily has the property of being capable of thought – but contingently has the property of having a beard.
"All As are necessarily Bs" is ambiguous between the box-inside form
"(x)(Ax ⊃ ☐Bx)" and the box-outside form
"☐(x)(Ax ⊃ Bx)." This sentence could have either of the following two meanings:
"All persons are necessarily persons."
- Everyone who in fact is a person has the necessary property of being a person.
= (x)(Px ⊃ ☐Px)
- This is necessary: "All persons are persons."
= ☐(x)(Px ⊃ Px)
The first is called
de re ("of the thing") necessity, because it attributes necessity to a specific entity having a specific property. The second is called
de dicto ("of the saying") necessity, because it attributes necessity to a whole sentence. The first form is more controversial.
Set K - Modal Proofs
Basic Proofs
Modal proofs require that we add world prefixes and broaden our notions of derived lines, assumptions, and RAA:
- A world prefix is a string of zero or more instances of "W." So " " (zero instances), "W," "WW," and so on are world prefixes. These represent possible worlds, with the blank world prefix (" ") representing the actual world.
- Modal logic's derived lines consist of a world prefix and then "∴" and then a wff (like "W ∴ A" – "Therefore A is true in world W"). Modal logic's assumptions consist of a world prefix and then "asm:" and then a wff (like "W asm: A" – "Assume that A is true in world W"). Unless otherwise specified, we can use an inference rule only within a given world.
- RAA: Suppose that some pair of not-blocked-off lines using the same world prefix have contradictory wffs. Then block off all the lines from the last not-blocked-off assumption on down and infer a line consisting in this assumption's world prefix followed by "∴" followed by a contradictory of that assumption.
Modal proofs use four new inference rules (where any pair of contradictory wffs can replace "A" / "∼A" and any world prefix can replace "W"):
| Reverse squiggles |
∼☐A ⇒ ◊∼A
∼◊A ⇒ ☐∼A |
| Drop diamonds |
◊A ⇒ W ∴ A,
use a new string of W's |
| Drop boxes |
☐A ⇒ W ∴ A,
use any world prefix |
A world prefix is
old if it already occurs in the argument; otherwise it's
new.
Our proof strategy still uses START, S&I, RAA, ASSUME and REFUTE. It adds these to the S&I part:
- First reverse squiggles: For each unstarred, not-blocked-off line that begins with "∼" and then a box or diamond, derive a line using the reverse-squiggle rules. Star the original line.
- And drop diamonds: For each unstarred, not-blocked-off line that begins with a diamond, derive an instance using the next available new world prefix (unless some such instance already occurs in previous lines). Star the original line.
- Lastly drop boxes: For each not-blocked-off line that begins with a box, derive instances using each old world. Don't star the original line; you might have to use it again. Note: Drop a box into the actual world just if (a) the premises or conclusion have an unmodalized instance of a letter, or (b) you've done everything else (including further assumptions if needed) and still have no other worlds.
Here's the general strategy:
START
S&I + new modal rules
RAA
ASSUME
REFUTE |
Here's a modal proof:
1 ☐(A • B) Valid
[∴ ☐A
* 2 ┌ asm: ∼☐A
* 3 │ ∴ ◊∼A {from 2}
4 │ W ∴ ∼A {from 3}
5 │ W ∴ (A • B) {from 1}
6 └ W ∴ A {from 5}
7 ∴ ☐A {from 2; 4 contradicts 6} |
We begin by assuming the opposite of the conclusion (line 2). We use the reverse-squiggle rules on 2 to get 3, drop "◊" in 3 using a new world "W" to get 4, and drop "☐" in 1 using the old world "W" to get 5. We derive line 6 using an S-rules. Finally, we apply RAA to complete the proof (line 7).
Invalid Arguments
If we attempt to prove an invalid modal argument, we'll instead be led to an
modal refutation – a galaxy of possible worlds that would make premises all true and conclusion false. Each world in the galaxy assigns "1" or "0" to the letters. Evaluate each wff as follows:
| "☐A" is true if and only if "A" is true in all worlds. |
| "◊A" is true if and only if "A" is true in at least one world. |
| "A" is true if and only if "A" is true in the actual world. |
As before, be sure to check that your attempted refutation works – that you get premises 1 and conclusion 0. If a line comes out wrong, then you did something wrong with it – either deriving something wrongly or else not deriving something that you should have derived.
Here's an invalid modal argument:
1 ☐(A ⊃ B) = 1
* 2 ◊A = 1
[∴ ☐B = 0
* 3 asm: ∼☐B
* 4 ∴ ◊∼B {from 3}
5 W ∴ A {from 2}
6 WW ∴ ∼B {from 4}
* 7 W ∴ (A ⊃ B) {from 1}
* 8 WW ∴ (A ⊃ B) {from 1}
9 W ∴ B {from 5 and 7}
10 WW ∴ ∼A {from 6 and 8} |
Invalid
W: ∼A, ∼B
WW: A, B |
We begin by assuming the opposite of the conclusion (line 3). We reverse squiggles (line 4). We drop each diamond into a new world, using "W" the first time and "WW" the second (lines 5 and 6). We drop the box from line 1 into each old world (lines 7 and 8). We derive a few more things using the I-rules (lines 9 and 10). Since we get no contradiction, we instead collect the simple wffs to get a refutation, as on the right above. Our little galaxy has two possible worlds, W and WW. In this galaxy, the first premise "☐(A ⊃ B)" is true, since "(A ⊃ B)" is true in both worlds:
In world W: (A ⊃ B) = (0 ⊃ 0) = 1
In world WW: (A ⊃ B) = (1 ⊃ 1) = 1
The second premise "◊A" is true, since "A" is true in at least one world (namely world WW). The conclusion "☐B" is false, since "B" is false in at least one world (namely world W). Since our refutation makes premises all true and conclusion false, the argument is shown to be invalid.
Galactic Travel
Logicians differ on the validity of some arguments (like "◊◊A ∴ ◊A") in which one modal operator occurs within the scope of another. These disputes reflect differences in how to formulate the box-dropping rule. So far, we've been assuming a system called "
S5," which lets us go from any world to any other world when we drop a box:
Drop boxes: If we have a "☐A" line, we can derive a "A" line. We can use any world prefixes (the same or different) in either line.
This assumes that whatever is necessary in any world is thereby true in all worlds without restriction. A further implication is that whatever is necessary in one world is thereby necessary in all worlds.
Some weaker views reject these ideas. On these views, what is necessary only has to be true in all "suitably related" worlds; these views qualify the drop-box rule. So we can't always go from "☐A" in one world to "A" in another world; traveling between worlds requires a suitable "travel ticket." (All the systems let us go from "☐A" in a world to "A" in that same world.)
We get travel tickets when we drop diamonds. Let "W1" and "W2" stand for world prefixes. Suppose we go from "◊A" in world W1 to "A" in a new world W2. Then we get a travel ticket from W1 to W2; we'll symbolize this by writing "W1 ⇒ W2." Suppose we are doing a proof with the formulas "◊◊P" and "◊Q"; then we could derive these lines and travel tickets (where "#" stands for the actual world):
1 ◊◊P
2 ◊Q
...
11 W ∴ ◊P {from 1}
12 WW ∴ P {from 11}
13 WWW ∴ Q {from 2} |
Travel Tickets
# ⇒ W
W ⇒ WW
# ⇒ WWW |
Tickets are reusable; we can use "W1 ⇒ W2" any number of times. The rules for using tickets vary. Some systems let us combine tickets or use them in both direction; but system T lets us use only one ticket at a time – and only in the direction of the arrow. Suppose that we have "☐A" in world W1 and want to put "A" in world W2:
- System T: We need a ticket from W1 to W2.
- System S4: Like T, but we also can use a series of tickets.
- System B: Like T, but a ticket also works backwards.
- System S5: We can go between worlds without restriction (no tickets needed).
In our example,
T lets us go from # to W, from W to WW, and from # to WWW. The other systems allow these and more.
S4 lets us use a series of tickets in the direction of the arrow; this lets us go from # to WW.
B lets us use single tickets in either direction; so we also can go from W to #, from WW to W, and from WWW to #.
S5 lets us go from any world to any other world.
S5 is the most liberal and accepts the greatest number of valid arguments.
T is the weakest system, allowing the fewest proofs. In practice, however, only a few arguments are valid in one system but invalid in another; these all involve wffs that apply a modal operator to a wff already containing a modal operator. Here's an argument where the difference is important:
1 ☐A
[∴ ☐☐A
* 2 ┌ asm: ∼☐☐A
* 3 │ ∴ ◊∼☐A {from 2}
* 4 │ W ∴ ∼☐A {from 3}
* 5 │ W ∴ ◊∼A {from 4}
6 │ WW ∴ ∼A {from 5}
7 └ WW ∴ A {from 1}
8 ∴ ☐☐A {from 2; 6 contradicts 7} |
Valid in S4
and S5
# ⇒ W
W ⇒ WW
|
We begin by assuming the opposite of the conclusion (line 2). We reverse squiggles and drop diamonds (lines 3 to 6). Along the way, we get two travel ticket: from # to W – and from W to WW. Line 7, in which we go from "☐A" in world # to "A" in world WW, requires that we combine a series of tickets in the direction of the arrow – which requires systems
S4 or
S5. Finally, we apply RAA to complete the proof (line 8).
Quantified Modal Arguments
There are two main approaches to
quantified modal logic. The
naive approach just combines the standard proof systems for modal and quantificational logic. This approach isn't entirely satisfactory, since it leads to certain things being provable that shouldn't be provable; the
sophisticated approach (which is discussed in the book) modifies some inference rules to avoid the problems. LogiCola keeps to the naive approach.
Here's a quantified modal argument:
1 (x)◊Ax = 1
[∴ ◊(x)Ax = 0
* 2 asm: ∼◊(x)Ax
3 ∴ ☐∼(x)Ax {from 2}
* 4 ∴ ◊Aa {from 1}
5 W ∴ Aa {from 4}
* 6 W ∴ ∼(x)Ax {from 3}
* 7 W ∴ (∃x)∼Ax {from 6}
8 W ∴ ∼Ab {from 7}
* 9 ∴ ◊Ab {from 1}
10 WW ∴ Ab {from 9}
* 11 WW ∴ ∼(x)Ax {from 3}
* 12 WW ∴ (∃x)∼Ax {from 6} |
Invalid
a, b
W: Aa, ∼Ab
WW: Ab, ∼Aa |
Applying the standard strategy leads us into an endless loop, where we keep getting new letters (lines 4, 8, 13, and every five lines thereafter) and new worlds (lines 5, 10, 15, and every five lines thereafter), endlessly. So we have to break out of the loop and figure out a refutation for ourselves. A good strategy is to try using the formulas that we've derived that contain the first two constants – and then add any further formulas that we need to make premises all true and conclusion false. The refutation on the right side works for our example. We can think of our argument as saying this:
(x)◊Ax = 1
∴ ◊(x)Ax = 0 |
It's possible for anyone to be above average.
∴ It's possible for everyone to be above average. |
Here each person is above average in some world or other – but in no world is every person above average. Since our refutation makes premises all true and conclusion false, the argument is shown to be invalid.
Set L - Deontic Translations
Imperative Translations
Imperative logic studies arguments with imperatives, like "Do this."
Deontic logic, by contrast, studies arguments whose validity depends on "ought," "permissible," and similar notions.
We'll take imperative logic first and then build deontic logic on it.
Imperative logic builds on our previous systems (propositional, quantificational, and modal logic); it adds underlining ("_") to form imperative wffs:
- Any underlined capital letter is an imperative wff.
- The result of writing a capital letter and then one or more small letters, one small letter of which is underlined, is an imperative wff.
Compare these forms:
Indicative
You're doing A
A
Au |
Imperative
Do A
A
Au
|
Here are some further translations:
|
∼A | = |
Don't do A. |
|
(A • B) | = |
Do A and B. |
|
∼(A • B) | = |
Don't both do A and do B.
Don't combine doing A with doing B. |
|
∼(A • ∼B) | = |
Don't combine doing A with not doing B.
Don't do A without doing B. |
Underline imperative parts but not factual ones:
|
(A • B) | = |
You're doing A and you're doing B. |
|
(A • B) | = |
You're doing A, but do B. |
|
(A • B) | = |
Do A and B. |
|
(A ⊃ B) | = |
If you're doing A, then you're doing B. |
|
(A ⊃ B) | = |
If you (in fact) are doing A, then do B. |
|
(A ⊃ B) | = |
Do A, only if you (in fact) are doing B. |
There's a subtle difference between the following two forms; the first tells you exactly what to do under specified circumstances – and the second tells you to avoid a certain combination of actions:
|
(A ⊃ ∼B) | = |
If you (in fact) are doing A, then don't do B. |
|
∼(A • ∼B) | = |
Don't combine doing A with not doing B. |
These examples build on quantificational logic and underline the letter for the agent:
|
Ax | = |
X, do (or be) A.
Let it be the case that X does A.
Would that X do A. |
|
Axy | = |
X, do A to Y.
Let it be the case that X does A to Y.
Would that X do A to Y. |
|
(x)Ax | = |
Let everyone do A. |
|
(∃x)Ax | = |
Let someone do A. |
|
(x)(Ax ⊃ Bx) | = |
Let everyone who (in fact) is doing A do B. |
|
(∃x)(Ax • Bx) | = |
Let someone who (in fact) is doing A do B. |
|
(∃x)(Ax • Bx) | = |
Let someone both do A and do B. |
Deontic Translations
Deontic logic studies arguments whose validity depends on "ought," "permissible," and similar notions. It builds on our previous systems (propositional, quantificational, and modal logic) and also on imperative logic. It adds two new symbols, "O" for ought and "R" for permissible (all right) and one additional way to form wffs:
- The result of writing "O" or "R," and then an imperative wff, is a deontic wff.
|
OA | = |
It ought to be that A.
Act A is obligatory (required, a duty). |
|
RA | = |
It would be all right that A.
Act A is right (permissible, OK). |
Here are further translations:
Act A is wrong (not right, ought not to be done)
= ∼RA = O∼A |
You ought to do A and B.
= O(A • B) |
If you do A, then you ought not to do B.
= (A ⊃ O∼B) |
You ought not to combine doing A with doing B.
= O∼(A • B) |
These examples build on quantificational logic:
X ought to do A.
= OAx |
X ought to do A to y.
= OAxy |
It would be all right for x to do A.
= RAx |
It would be all right for x to do A to y.
= RAxy |
It's obligatory that everyone do A.
= O(x)Ax |
It isn't obligatory that everyone do A.
= ∼O(x)Ax |
It's obligatory that not everyone do A.
= O∼(x)Ax |
It's obligatory that everyone refrain from doing A.
= O(x)∼Ax |
It's obligatory that someone or other answer the phone.
= O(∃x)Ax |
There's someone (some specific person) who has an
obligation to answer the phone.
= (∃x)OAx |
These three are importantly different:
It's obligatory that some who kill repent.
= O(∃x)(Kx • Rx) |
It's obligatory that some kill who repent.
= O(∃x)(Kx • Rx) |
It's obligatory that some both kill and repent.
= O(∃x)(Kx • Rx) |
Here the underlined letters show which parts are obligatory: repenting, killing, or killing-and-repenting. If we just attached "O" to indicatives, our formulas couldn't distinguish the forms; all three would translate as "O(∃x)(Kx • Rx)." Because of such examples, we need to attach "O" to imperative wffs, not to indicative ones.
Set M - Deontic Proofs
Imperative Arguments
Imperative proofs work much like indicative ones and require no new inference rules. But we must treat "A" and "
A" as different wffs. "A" and "∼
A" aren't contradictories; it's consistent to say "You're now doing A, but don't."
Imperative logic raises questions about the meaning of "valid." This imperative argument is intuitively "valid":
If the cocoa is boiling, remove
it from the heat.
The cocoa is boiling.
∴ Remove it from the heat. |
(B ⊃ R) Valid
B
∴ R |
"Valid" here can't mean that it's impossible to have true premises and a false conclusion – for imperatives aren't true-or-false. So we'll broaden what we mean by "valid argument." Henceforth a "valid argument" is an argument in which the conjunction of the premises with the contradictory of the conclusion is inconsistent; note that this definition avoids the words "true" and "false." Our argument is valid in this sense because this combination is inconsistent:
If the cocoa is boiling, remove it
from the heat. The cocoa is boiling.
But don't remove it from the heat. |
Here's an invalid argument with a don't-combine premise:
Don't combine accelerating
with braking.
You're accelerating.
∴ Don't brake. |
∼(A • B) Invalid
A
∴ ∼B |
The first premise forbids the accelerating-and-braking combination. If we accelerate, it doesn't follow that we shouldn't brake; maybe we need to brake and stop accelerating (perhaps to avoid a crash). It's consistent to conjoin the premises with the contradictory of the conclusion:
Don't combine accelerating with
braking. You're accelerating. But
don't accelerate. Instead, brake. |
Here's a refutation of the argument, put in two equivalent ways:
∼(A • B)
A
∴ ∼B |
Invalid
A, ∼A, B |
A = 1
A = 0
B = 1 |
This makes premises "1" and conclusion "0." Since imperatives aren't true-or-false, we must understand "1" and "0" more broadly; we'll now read these as "correct" and "incorrect." With indicatives, "correct" / "incorrect" mean
true /
false. With imperatives, these mean that the prescribed action is
correct /
incorrect relative to some standard (moral or legal or whatever) that divides the actions prescribed by the imperative letters into correct and incorrect actions. In our refutation, the statement "You accelerate" is "1" (correct in the sense of true) while the imperative "Accelerate" is "0" (incorrect in the sense that the act is a bad thing to do).
The
don't-combine form "∼(
A •
B)" is important for imperative logic. Compare these two:
(A ⊃ ∼B)
If you're accelerating,
then don't brake. |
∼(A • B)
Don't combine accelerating
with braking. |
The if-then tells you exactly what to do under specified circumstances, while the don't-combine form just tells you to avoid a certain combination. Suppose that A is true (you're accelerating). The if-then tells you not to brake. The don't-combine doesn't tell you this; maybe you should instead brake and stop accelerating.
Consistency imperatives, if properly formulated, use the don't-combine form. Compare these two:
(B ⊃ A)
If you believe that
you ought to do A,
then do A. |
∼(B • ∼A)
Don't combine believing
that you ought to do A
with not doing A. |
The if-then form can tell you to do evil things when you have malformed beliefs. The don't-combine form is better; it just forbids an inconsistent belief-action combination. If your beliefs conflict with your actions, you have to change one or the other; either may be defective.
Here's an invalid imperative argument:
* 1 (Bº ⊃ Aº) = 1
[∴ ∼(B¹ • ∼Aº) = 0
* 2 asm: (B • ∼A)
3 ∴ B {from 2}
4 ∴ ∼A {from 2}
5 ∴ ∼B {from 1 and 4}
|
Invalid
∼B, B, ∼A |
We begin by assuming the opposite of the conclusion (line 2). We derive all we can using the S- and I-rules (lines 3 to 5). Since we get no contradiction, we instead collect the simple wffs to get a refutation (in the right-hand box); this makes the premises "1" (true or correct) and conclusion "0" (false or incorrect). So the argument is invalid.
Deontic Arguments
Deontic proofs require that we broaden our notions of world prefixes and possible worlds:
- A world prefix is now a string of zero or more instances of "W" or "D." We can use these expanded world prefixes in derived lines and assumptions, as in modal logic. "D," "DD," and so on now represent deontic worlds.
- We now understand a possible world to be a complete and consistent set of indicatives and imperatives. A deontic world is a possible world (in this expanded sense) in which (a) the indicative statements are all true, and (b) the imperatives prescribe some jointly permissible combination of actions. So then act A ought to be done ("OA") if and only if "Do A" is in all deontic worlds – and act A is permissible ("RA") if and only if "Do A" is in some deontic worlds.
Deontic proofs add six new inference rules. In these first four, any pair of contradictory imperative wffs can replace "
A" / "∼
A":
| Reverse squiggles |
∼OA ⇒ R∼A
∼RA ⇒ O∼A |
| Drop initial R's |
RA ⇒ D ∴ A,
use a new string of D's |
| Drop initial O's |
OA ⇒ D ∴ A,
use a blank or any string of D's |
In the rule about dropping R's, the world prefix of the derived line must be the same as that of the original line, except that it adds a new string (a string not occurring in earlier lines) of one or more D's at the end. In the rule about dropping O's, the world prefix of the derived line must either be the same as that of the original line or else the same except that it adds one or more D's at the end.
These four rules work much like the earlier modal and quantificational rules. You can star the original line when you reverse squiggles or drop initial R's – but not when you drop initial O's. It's generally useful to drop O's into the actual world (going from "O
A" to "
A" in the same world) only if the actual world contains some imperative formulas that aren't part of a wff beginning with "O" or "R."
The next rule, the
indicative transfer rule, is used infrequently. The rule lets us transfer indicatives freely from a deontic world to whatever world it depends on (usually the actual world); this holds because a deontic world and whatever world it depends on have the same indicative wffs:
D ∴ A
———
∴ A |
"A" must be
an indicative
wff. |
The world prefixes of the derived and deriving lines must be identical except that one ends in one or more additional D's. It can be useful to move an indicative between world D and the actual world (or vice versa) when we need it elsewhere to get a contradiction or apply an I-rule.
The final rule,
Kant's Law, says that "ought" entails "can" – "You ought to do A" ("OA") entails "It's possible for you to do A" ("◊A"):
OA
———
∴ ◊A |
Here "A" is an imperative wff
while "A" is the corresponding
indicative wff. |
Here the derived and original lines have the same world prefix. Kant's Law is often useful with arguments that contain both deontic and modal operators.
Here's a deontic proof:
1 O(x)(Ax ⊃ Bx) Valid
2 Ag
[∴ OBg
* 3 ┌ asm: ∼OBg
* 4 │ ∴ R∼Bg {from 3}
5 │ D ∴ ∼Bg {from 4}
6 │ D ∴ (x)(Ax ⊃ Bx) {from 1}
* 7 │ D ∴ (Ag ⊃ Bg) {from 6}
8 │ D ∴ ∼Ag {from 5 and 7}
9 └ ∴ ∼Ag {from 8 by indicative transfer rule}
10 ∴ OBg {from 3; 2 contradicts 9} |
We begin by assuming the opposite of the conclusion (line 3). We use the reverse-squiggle rules on 3 to get 4, drop "R" in 4 using a new deontic world "D" to get 5, and drop "O" in 1 using the old deontic world "D" to get 6. We derive lines 7 and 8 using quantificational and propositional rules. We apply the indicative transfer rule on 8 to get line 9. Finally, we apply RAA to complete the proof (line 10).
Set N - Belief Translations
Believing
Belief logic is "logic" in an extended sense. Instead of studying what follows from what, belief logic studies patterns of consistent believing and willing; it generates consistency norms that prescribe that we be consistent in various ways. We'll give a simplified system here; the book also gives a more sophisticated system with refinements and qualifications.
Belief logic builds on our previous systems. It adds the symbol ":" and two additional ways to form wffs:
- The result of writing a small letter and then ":" and then a wff is a descriptive wff;
- The result of writing an underlined small letter and then ":" and then a wff is an imperative wff.
Here are some descriptive belief formulas:
|
u:A | = |
You believe that A is true. |
|
∼u:A | = |
You don't believe that A is true. |
|
u:∼A | = |
You believe that A is false. |
|
(∼u:A • ∼u:∼A) | = |
You take no position on A. |
|
(u:A ⊃ ∼u:B) | = |
If you believe A, then you don't believe B. |
|
u:OAu | = |
You believe that you ought to do A. |
|
u:(x)OAx | = |
You believe that everyone ought to do A. |
|
(x)x:OAu | = |
Everyone believes that you ought to do A. |
Here are corresponding imperative belief formulas:
|
u:A | = |
Believe that A is true. |
|
∼u:A | = |
Don't believe that A is true. |
|
u:∼A | = |
Believe that A is false. |
|
(∼u:A • ∼u:∼A) | = |
Take no position on A. |
|
(u:A ⊃ ∼u:B) | = |
If you believe A, then don't believe B. |
|
u:OAu | = |
Believe that you ought to do A. |
|
u:(x)OAx | = |
Believe that everyone ought to do A. |
|
(x)x:OAu | = |
Let everyone believe that you ought to do A. |
As before, we distinguish between if-then and don't-combine forms:
|
(u:A ⊃ ∼u:B) | = |
If you (in fact) believe A, then don't believe B. |
|
∼(u:A • u:B) | = |
Don't combine believing A with believing B. |
Willing
We will treat
willing as accepting-an-imperative (just as we previously treated
believing as accepting-an-indicative):
|
u:A | = |
You accept (endorse, assent to) "Let A be done."
You will that A be done. |
In translating "u:A," we'll often use terms more specific than "wills." We'll use words like "acts," "resolves," or "desires." Which of these fits depends on whether the imperative is present or future – and whether it applies to oneself or to another. Here are three examples:
- If A is present: u:Au = You accept the imperative for you to do A now = You act (in order) to do A.
- If A is future: u:Au = You accept the imperative for you to do A in the future = You're resolved to do A.
- If u≠x: u:Ax = You accept the imperative for X to do A = You desire that X do A = You want X to do A.
"You act (in order) to do A" ("u:A
u") is about what you try or intend to do, while "You do A" ("Au") is about what you actually do (perhaps accidentally).
These three are importantly different:
|
u:(∃x)(Kx • Rx) | = |
You desire that some who kill repent. |
|
u:(∃x)(Kx • Rx) | = |
You desire that some kill who repent. |
|
u:(∃x)(Kx • Rx) | = |
You desire that some both kill and repent. |
Underlining shows the desired parts (repenting, or killing, or killing-and-repenting) – and what imperative you are endorsing:
Would that some who kill repent.
Would that some kill who repent.
Would that some both kill and repent. |
If we just attached "desire" to indicative formulas, all would translate the same – as "You desire it to be the case that there is someone who both kills and repents."
These imperative formulas tell someone to will something:
- If A is present: u:Au = Accept the imperative for you to do A now = Act (in order) to do A.
- If A is future: u:Au = Accept the imperative for you to do A in the future = Be resolved to do A.
- If u≠x: u:Ax = Accept the imperative for X to do A = Desire that X do A = Want X to do A.
Underlining can be confusing. This chart shows the basic cases:
Indicatives
u:A = You believe A.
u:A = You will A. |
Imperatives
u:A = Believe A.
u:A = Will A. |
Underlining before ":" makes the formula an imperative (instead of an indicative). Underlining after ":" makes the formula about willing (instead of believing).
As before, we distinguish if-then from don't-combine forms:
(u:O∼Au ⊃ ∼Au)
=
If you believe that it's wrong for
you to do A, then don't do A. |
∼(u:O∼Au • u:Au)
=
Don't combine believing that it's wrong for
you to do A with acting to do A. |
The don't-combine form is provable.
Rationality
Beliefs can be
evident or
reasonable for a given person. As I shade my eyes from the bright sun, my belief that it's sunny is evident; it's very solidly grounded. As I hear the prediction of rain, my belief that it will rain is reasonable; my belief accords with reason but isn't solid enough to be evident. "Evident" expresses a higher certitude than does "reasonable." We'll symbolize these two notions as follows:
|
Ou:A | = |
A is evident to you.
It's obligatory (rationally required) that you believe A.
Insofar as intellectual considerations are concerned,
you ought to believe A. |
|
Ru:A | = |
A would be reasonable for you to believe.
It's all right (rationally permissible) that you believe A.
Insofar as intellectual considerations are concerned,
it would be all right for you to believe A. |
Neither entails that you believe A. To claim that a proposition A that you believe is evident or reasonable, we'll use "(u:A • O
u:A)" or "(u:A • R
u:A)."
"Evident" and "reasonable" are relational. "It's raining" might be evident to a person outside, but not to someone inside, since the two people might have different experiences. When I say a belief is evident or reasonable, but don't say to whom, assume that I mean
to you.
We again distinguish if-then from don't-combine forms:
(u:O∼Au ⊃ O∼Au)
=
If you believe that it's wrong for you to
do A, then you ought not to do A. |
O∼(u:O∼Au • u:Au)
=
You ought not to combine believing that it's
wrong for you to do A with acting to do A. |
Both of these are
formal ethical principles – ethical principles that can be formulated using the abstract notions of our logical systems plus variables. The don't-combine form is provable in our system, while the if-then form leads to absurdities (see the book).
Set O - Belief Proofs
Belief Arguments
Belief logic, as we develop it here, studies consistency imperatives and duties. It assumes that we ought to be consistent (a principle that's subject to some implicit qualifications) and generates
consistency norms like these three:
∼(u:A • u:∼A)
Don't combine believing A
with believing not-A. |
∼(u:(A • B) • ∼u:A)
Don't combine believing A-and-B
with not believing A. |
All three are provable in belief logic. We'll take an argument to be "valid in belief logic" if it's valid presuming an implicit "We ought to be consistent" premise, which is built into the inference rules.
Belief proofs require that we broaden our notions of world prefixes and possible worlds:
- A world prefix is now a string of zero or more instances of letters from "W," "D," and the set of small letters. Here "u," "uu," "uuu," ... represent u's belief worlds.
- Suppose that we have a set of imperatives telling you what to believe or refrain from believing. A belief world, relative to these imperatives, is a possible world that contains everything that you're told to believe.
If you're told to believe A, then
all your belief worlds have A. Now individual belief worlds may contain further statements. For example, if you're told to be neutral about A (to refrain from believing A and to refrain from believing not-A), then some of your belief worlds will have A and some will have not-A. And if you're told to refrain from believing A, then some of your belief worlds will have not-A. What is common to all of your belief worlds is what you're positively told to believe.
Belief logic adds two inference rules, called "B−" and "B+"; in these, any pair of contradictory wffs can replace "A" / "∼A" and any small letter constant can replace "x":
| B− |
∼u:A ⇒ u ∴ ∼A,
use a new string of u's |
| B+ |
u:A ⇒ u ∴ A,
use any string of u's |
For both rules, the original line can use any world prefix not containing small letters or "W" – and the derived line must use a world prefix that is the same except that it adds a string of one or more u's at the end; in the B− rule, in addition, the string of u's at the end must be new (one what hasn't occurred in earlier lines).
B− and B+ apply only to imperative belief formulas; our belief logic generates consistency imperatives (imperatives that tell us to be consistent in certain ways). We can do little with an indicative belief formula, like "u:A." Our belief worlds are about what you are told to believe – not about what you actually believe.
The general strategy is to try to use B− first, using it to introduce a new belief world each time, and to use B+ later, using the old belief worlds that you've already introduced. Star the original line when you use B−, but not when you use B+. In some cases, you may have to drop B+ using a new belief world; but try to put this off as long as you can.
Here's a belief proof (here the formula tells us not to combine believing A and believing not-A):
[∴ ∼(u:A • u:∼A) Valid
* 1 ┌ asm: (u:A • u:∼A)
2 │ ∴ u:A {from 1}
3 │ ∴ u:∼A {from 1}
4 │ u ∴ A {from 2}
5 └ u ∴ ∼A {from 3}
6 ∴ ∼(u:A • u:∼A) {from 1; 4 contradicts 5} |
We begin by assuming the opposite of the conclusion (line 1). We simplify this to get 2 and 3. Since we don't have any negative belief formulas, we use B+ on the positive belief formula in 2, using a new belief world "u" to get 4. We apply B+ on 3 to get 4. Finally, we apply RAA to complete the proof (line 7).
Rationality Arguments
Rationality proofs follow the same rules and work much the same. However, since we start with formulas like "Ou:A" in which a belief imperative occurs after a deontic operator, we typically end up with complicated belief worlds – like "Du" (which is a belief world of person u relative to a deontic world D); intuitively, this represents a belief world relative to what is permissible to believe in that deontic world.
We distinguish weak operators from strong operators:
| Weak operators: |
Strong operators: |
| ∼u: R ◊ (∃x) |
u: O ☐ (x) |
In dropping operators, try to drop the weak operators first – using a new world or constant – and starring the original line. Then try to drop these strong operators – using old worlds or constants if you have them – but not starring the original line. Drop "u:" and "O" before dropping the very strong "☐."
Here's a rationality proof (here the formula says that you ought not to combine (1) believing that you ought not to do A with (2) acting to do A):
[∴ O∼(u:O∼Au • u:Au) Valid
* 1 ┌ asm: ∼O∼(u:O∼Au • u:Au)
* 2 │ ∴ R(u:O∼Au • u:Au) {from 1}
* 3 │ D ∴ (u:O∼Au • u:Au) {from 2}
4 │ D ∴ u:O∼Au {from 3}
5 │ D ∴ u:Au {from 3}
6 │ Du ∴ O∼Au {from 4}
7 │ Du ∴ Au {from 5}
8 └ Du ∴ ∼Au {from 6}
9 ∴ O∼(u:O∼Au • u:Au) {from 1; 7 contradicts 8} |
We begin by assuming the opposite of the conclusion (line 1). We reverse squiggles to get 2. We drop "R" in 2 using a new deontic world "D" to get 3. We simplify 3 to get 4 and 5. Since we don't have any negative belief formulas, we use B+ on the positive belief formula in 4, using a new belief world "Du" to get 6. We apply B+ on 5 to get 7. We drop the "O" from 6 to get 8. Finally, we apply RAA to complete the proof (line 9).
Set P - Probability
Click
dice or
cards if you'd like to review the rules assumed about these (which aren't universal across all cultures).
Percent
This rule holds if each case is equally likely:
- The probability of A = (the number of favorable cases) / (the total number of cases)
So the probability of picking an ace randomly out of a normal deck of 52 cards = 4/52 = 1/13 = about 7.7%.
Odds
Odds express probability as a ratio between favorable and unfavorable cases. The following rules presume that each case is equally likely.
- The odds are against you if there are more unfavorable cases than favorable ones. Then the odds against A = (the number of unfavorable cases) / (the number of favorable cases). So the odds against picking an ace randomly out of a normal deck of 52 cards = 48/4 = 12/1 = 12 to 1.
- The odds are even if the number of favorable cases equals the number of unfavorable cases. So the odds of picking a heart or diamond randomly out of a normal deck of 52 cards are even (since 26=26).
- The odds are in your favor if there are more favorable cases than unfavorable ones. Then the odds in favor of A = (the number of favorable cases) / (the number of unfavorable cases). So the odds of picking a non-face card randomly out of a normal deck of 52 cards = 40/12 = 10/3 = 10 to 3 = 3.33 to 1.
Complex
Here are three simple rules for calculating probability:
- The probability of a necessary truth = 100%. So the probability that it will either rain or not rain = 100%.
- The probability of a self-contradiction = 0%. So the probability that it will both rain and not rain = 0%.
- The probability of not-A = (100% - the percent probability of A). So if there's a 40% chance of having rain then there's a 60% chance of not having rain.
Here are two rules for calculating
the probability of (A and B):
- If A and B are independent events (the occurrence of one doesn't make the occurrence of the other any more or less likely), then the probability of (A and B) = (the probability of A) • (the probability of B). So if the probability of the first coin landing heads is 50% and the probability of the second coin landing heads is 50% then the probability of both coin landing heads = 50% • 50% = 25%.
- If A and B aren't independent events, then the probability of (A and then B) = (the probability of A) • (the probability of B after A occurs). So the probability of drawing a pair of aces when you draw two cards randomly from a normal deck of 52 cards = (4/52) • (3/51) = about 7.7% • 5.9% = about 0.45%.
Here are two rules for calculating
the probability of (A or B):
- If A and B are mutually exclusive events (they can't both happen together) then the probability of (A or B) = (the probability of A) + (the probability of B). So if the probability of picking an ace is 7.7% and the probability of instead picking a king is 7.7% then the probability of picking an ace or king = 7.7% + 7.7% = 15.4%.
- If A and B aren't mutually exclusive, then the probability of (A or B) = (the probability of A) + (the probability of B) - (the probability of (A and B)). So the probability of getting at least one head when flipping two coins = (the probability of getting the first head) + (the probability of getting the second head) - (the probability of getting both heads) = 50% + 50% - 25% = 75%.
Here is how to convert from
odds to probability:
- If the odds in favor of A are x to y, then the probability of A = x / (x+y). So if the odds are 3 to 2 in favor of Michigan winning, then the probability of Michigan winning = 3 / (3+2) = 3/5 = 60%.
- If the odds are even (1 to 1) that A will happen, then the probability of A = 50%.
- If the odds against A are x to y, then the probability of A = y / (x+y). So if the odds are 9 to 1 against Ohio State winning, then the probability of Ohio State winning = 1 / (9+1) = 1/10 = 10%.
Gamble
The expected gain of betting on A = (the probability of A happening • the money you get if A happens) - (the probability of A not happening • the money you lose if A doesn't happen).
Suppose that you bet $10 that you'll draw an ace randomly out of a normal deck of 52 cards; you'll get $150 if you win and forfeit your $10 if you lose. The expected gain of this bet is ($150 • 4/52) - ($10 • 48/52) = $11.54 - $9.23 = $2.31. While you'd probably lose money if you bet this way just once, you'd likely win about $231 if you bet this way 100 times.
Decide
In terms of expected gain,
decision A is better than B if the expected gain of A is greater than the expected gain of B. My travel agent once gave me two alternatives:
- Ticket A costs $250 and allows me to change my return date.
- Ticket B costs $200 but has a $125 charge if I have to change my return.
Let's suppose that there's a 20% probability that I'll have to change my return. Then the expected cost of A is $250 (since that's what it is regardless of what happens) while the expected cost of B = $200 + ($125 • 20%) = $200 + $25 = $225. So, in terms of expected gain, ticket B is the better deal.
In some cases, however, it might be more rational to pick A. Maybe I have $250 but I don't have the $325 that option B might cost me – so I'd be in great trouble if I had to change the return date. It might then be more rational to follow the "better safe than sorry" principle and pick A.
Induction
Inductive reasoning generalizes on our experience and leads at best to a probable conclusion. The
statistical syllogism, a common form of inductive reasoning, goes as follows:
N percent of A's are B's.
X is an A.
This is all we know about the matter.
∴ It's N percent probable that X is a B. |
Suppose that 90% of the Appalachian Trail shelters have water, Rocky Gap Shelter is an Appalachian Trail shelter, and this is all we know about the matter. Then we could conclude that it's 90% probable that Rocky Gap Shelter has water.
The
sample-projection syllogism goes as follows:
N percent of examined A's are B's.
A large and varied group of A's has been examined.
∴ Probably roughly N percent of all A's are B's. |
Suppose that 90% of all examined cats purr – and a large and varied group of cats has been examined. Then we could conclude that probably roughly 90 percent of all cats purr.
The
analogy syllogism goes as follows:
Most of the things true of X are also true of Y.
X is A.
This is all we know about the matter.
∴ Probably Y is A. |
Suppose that most of the things true of the first casino we visit are also true of the second casino we visit. The first casino has an all-you-can-eat buffet. This is all we know about the matter. Then we could reasonably suppose that the second casino probably also has an all-you-can-eat buffet.
Mill
Mill's methods are rough rules for arriving at and justifying claims about causes. The basic insight behind them is that factors occurring together in some regular way are likely to be causally related. We'll consider four of his methods.
The
method of agreement reasons as follows:
A occured more than once.
B is the only additional factor that
occured if and only if A occured.
∴ Probably B caused A, or A caused B. |
Suppose that there are several cases of sickness. The eating of Judy's pie is the only additional factor that occurs if and only if the sickness occurs. Then we could conclude that probably eating her pie caused people to get sick, or getting sick caused them to eat her pie.
The
method of disagreement reasons as follows:
A occurred in some case.
B didn't occur in the same case.
∴ A doesn't necessarily cause B. |
Suppose that I ate Judy's pie but didn't get sick. Then we can conclude that eating her pie doesn't necessarily cause sickness.
The
method of difference reasons as follows:
A occurred in the first case but not the second.
The cases are otherwise identical, except that B also
occurred in the first case but not in the second.
∴ Probably B is (or is part of) the cause of A, or A is (or
is part of) the cause of B. |
Suppose that X got sick but Y didn't. The cases are otherwise identical, except that X ate Judy's pie but Y didn't. Then we can conclude that probably X's eating her pie is (or is part of) the cause of his sickness, or X's sickness is (or is part of) the cause of his eating the pie.
The
method of variation reasons as follows:
A changes in a certain way if and only if B
also changes in a certain way.
∴ Probably B caused A, or A caused B, or
some C caused both A and B. |
Suppose that how sick people got correlated with how much of Judy's pie they ate. Then we can conclude that probably eating her pie caused the sickness, or the sickness caused them to eat her pie, or something else caused both the eating and the sickness.
Dice
Dice are six-sided cubes, often made from plastic or wood, used in games of chance. Each side has a number of dots from 1 to 6 (so rolling the cube will randomly give you a number from 1 to 6):
*
|
*
*
|
*
*
*
|
* *
* *
|
* *
*
* *
|
* *
* *
* *
|
Judy and you might each roll a single die ("die" is singular, "dice" is plural); the person with the higher number on top wins. Suppose Judy rolls a 2:
You beat Judy if you roll a 3, 4, 5, or 6; so you have a 4 in 6 (66.7%) chance of beating Judy. You tie if you roll a 2; so you have a 1 in 6 (16.7%) chance of tying. You lose if you roll a 1; so you have a 1 in 6 (16.7%) chance of losing. So your chance of tying is the same as your chance of losing.
Often people roll two dice, and get a score that equals both numbers added together. Suppose Judy rolls a 7 (4+3):
You beat Judy if you get an 8 or above, which you can get 15 ways (6+2, 6+3, 6+4, 6+5, 6+6, 5+3, 5+4, 5+5, 5+6, 4+4, 4+5, 4+6, 3+5, 3+6, 2+6); so you have a 15 in 36 (41.7%) chance of beating Judy. You tie if you get exactly 7, which you can get in 6 ways (6+1, 5+2, 4+3, 3+4, 2+5, 1+6); so you have a 6 in 36 (16.7%) chance of tying. You lose if you get 6 or below, which you can get in 15 ways (5+1, 4+2, 4+1, 3+3, 3+2, 3+1, 2+4, 2+3, 2+2, 2+1, 1+5, 1+4, 1+3, 1+2, 1+1); so you have a 15 in 36 (41.7%) chance of losing. So your chance of winning is the same as your chance of losing.
Cards
Playing cards are rectangles, often made of plastic-covered paper, used in playing card games that typically combine chance and strategy. In the system assumed here, cards have one of 13 values. In ascending order, these values are 2, 3, 4, 5, 6, 7, 8, 9, 10, J (jack), Q (queen), K (king), and A (ace):
lower
|
2 3 4 5 6 7 8 9 10 J Q K A
|
higher
|
Higher values beat lower ones so a 9 beats a 3, a Q (queen) beats any card lower in the sequence, and an A (ace) beats any other card.
A standard deck of cards has 52 cards, divided into 4 suits (hearts ♥, diamonds ♦, clubs ♣, and spades ♠). Each suit has one card for each of the 13 values. So the 52 cards in a standard deck look like this:
2
♥
♥
2 |
3
♥
♥
♥
3 |
4
♥ ♥
♥ ♥
4 |
5
♥ ♥
♥
♥ ♥
5 |
6
♥ ♥
♥♥
♥ ♥
6 |
7
♥ ♥
♥♥♥
♥ ♥
7 |
8
♥ ♥
♥♥♥♥
♥ ♥
8 |
9
♥♥♥
♥♥♥
♥♥♥
9 |
10
♥♥♥♥
♥ ♥
♥♥♥♥
10 |
J
♥
♥
J |
Q
♥
♥
Q |
K
♥
♥
K |
A
♥
A |
2
♦
♦
2 |
3
♦
♦
♦
3 |
4
♦ ♦
♦ ♦
4 |
5
♦ ♦
♦
♦ ♦
5 |
6
♦ ♦
♦♦
♦ ♦
6 |
7
♦ ♦
♦♦♦
♦ ♦
7 |
8
♦ ♦
♦♦♦♦
♦ ♦
8 |
9
♦♦♦
♦♦♦
♦♦♦
9 |
10
♦♦♦♦
♦ ♦
♦♦♦♦
10 |
J
♦
♦
J |
Q
♦
♦
Q |
K
♦
♦
K |
A
♦
A |
2
♣
♣
2 |
3
♣
♣
♣
3 |
4
♣ ♣
♣ ♣
4 |
5
♣ ♣
♣
♣ ♣
5 |
6
♣ ♣
♣♣
♣ ♣
6 |
7
♣ ♣
♣♣♣
♣ ♣
7 |
8
♣ ♣
♣♣♣♣
♣ ♣
8 |
9
♣♣♣
♣♣♣
♣♣♣
9 |
10
♣♣♣♣
♣ ♣
♣♣♣♣
10 |
J
♣
♣
J |
Q
♣
♣
Q |
K
♣
♣
K |
A
♣
A |
2
♠
♠
2 |
3
♠
♠
♠
3 |
4
♠ ♠
♠ ♠
4 |
5
♠ ♠
♠
♠ ♠
5 |
6
♠ ♠
♠♠
♠ ♠
6 |
7
♠ ♠
♠♠♠
♠ ♠
7 |
8
♠ ♠
♠♠♠♠
♠ ♠
8 |
9
♠♠♠
♠♠♠
♠♠♠
9 |
10
♠♠♠♠
♠ ♠
♠♠♠♠
10 |
J
♠
♠
J |
Q
♠
♠
Q |
K
♠
♠
K |
A
♠
A |
Every deck uses the same pattern or picture for the back of each card, so the back of the cards look the same. When the deck is shuffled (randomized) and all you see is the back of the cards, then picking a card gives you a random card.
This chart represent a standard deck more compactly:
hearts ♥
diamonds ♦
clubs ♣
spades ♠ |
2 3 4 5 6 7 8 9 10 J Q K A
2 3 4 5 6 7 8 9 10 J Q K A
2 3 4 5 6 7 8 9 10 J Q K A
2 3 4 5 6 7 8 9 10 J Q K A
|
Again, a standard deck has 52 cards: 4 suits x 13 values.
Judy and you might each pick a single card from a standard deck, which has been shuffled (randomized); the person with the higher card wins. Suppose Judy picks a 4 of hearts:
You beat Judy if you pick a 5 or above of any suit; since there are 40 such cards (10 of each suit) in the remaining 51 cards, you have a 40 in 51 (78.4%) chance of beating Judy. You tie if you pick a 4; since there are 3 such cards in the remaining 51 cards, you have a 3 in 51 (5.9%) chance of tying. You lose if you pick a 3 or below of any suit; since there are 8 such cards (2 of each suit), you have an 8 in 51 (15.6%) chance of losing.
Suppose that Judy, after having just picked a 4 of hearts, wants to pick another 4. As just noted, since there are 3 such cards in the remaining 51 cards, she has a 3 in 51 (5.9%) chance of picking another 4. Or suppose that she instead wants to pick another heart; since there are 12 more hearts in the remaining 51 cards, she has a 12 in 51 (23.5%) chance of picking another heart. Or suppose that she instead wants to pick another 4 of hearts; since there are no more such cards in the remaining 51 cards, she has a 0 in 51 (0%) chance of picking another 4 of hearts.
People sometimes play using a double deck, which puts two standard decks together and thus has 104 cards (26 for each suit). The probabilities change if we use a double deck. Suppose that Judy, after having just picked a 4 of hearts, wants to pick another 4 from a double deck. Since now there are 7 such cards in the remaining 103 cards, she has a 7 in 103 (6.8%) chance of picking another 4. Or suppose that she instead wants to pick another heart from the double deck; since there now are 25 more hearts in the remaining 103 cards, she has a 25 in 103 (24.3%) chance of picking another heart. Or suppose that she instead wants to pick another 4 of hearts from the double deck; since there now is one such card in the remaining 103 cards, she has a 1 in 103 (0.97%) chance of picking another 4 of hearts.
Set Q - Definitions
A
definition is a rule of paraphrase designed to explain meaning. More precisely, a definition of a word or phrase is a rule saying how to eliminate this word or phrase in any sentence using it and produce a second sentence that means the same thing – the purpose of this being to explain or clarify the meaning of the word or phrase.
Definitions may be
stipulative (specifying your own usage) or
lexical (explaining current usage). A
good lexical definition should allow us to "paraphrase out" a term – to produce a second sentence that means the same thing but doesn't use the defined term. A good lexical definition should:
- be neither too broad nor too narrow,
- avoid circularity and poorly understood terms,
- match in vagueness the term defined,
- match, as far as possible, the emotional tone (positive or negative or neutral) of the term defined, and
- include only properties essential to the term.
Here are examples of faulty definitions:
- This is too broad (since there are men who aren't bachelors): "Bachelor" means "man."
- This is too narrow (since there are bachelors who aren't astronauts): "Bachelor" means "unmarried male astronaut."
- This is circular (since it defines "true" using "true"): "True" means "known to be true."
- This uses poorly understood terms (since "aretaic" is less clear than "good"): "Good" means "having positive aretaic value."
- This has a poor match in vagueness (since the defining expression is much more precise than "bachelor"): "Bachelor" means "unmarried male over 18 years old."
- This has a poor match in emotional tone (since the defining expression is laudatory): "Bachelor" means "fortunate man who hasn't married."
- This includes non-essential properties (since we could imagine a bachelor who lives on the moon): "Bachelor" means "unmarried man living on the earth."
Set R - Fallacies
A
fallacy is a deceptive error of thinking; an
informal fallacy is a deceptive error of thinking that isn't covered by some system of deductive or inductive logic. Here we'll study 18 informal fallacies, divided into four groups.
Our first group of fallacies can be explained as defects in what is required for a good argument. A
good argument (in the sense of a non-defective and pragmatically useful argument) should ideally:
- be deductive valid (or inductively strong) and have all true premises;
- have its validity and truth-of-premises be as evident as possible to the parties involved;
- be clearly stated (using understandable language and making clear what the premises and conclusion are);
- avoid circularity, ambiguity, and emotional language; and
- be relevant to the issue at hand.
This first group of fallacies violate the last two conditions:
- Circular (question begging): Presuming the truth of what is to be proved. Or: using a premise to prove a conclusion – and then using that conclusion to prove the premise.
- Ambiguous: Changing the meaning of a term or phrase within the argument.
- Appeal to emotion: Stirring up emotions instead of arguing in a logical manner.
- Beside the point: Arguing for a conclusion irrelevant to the issue at hand. (This fallacy isn't just where the premises are irrelevant to the conclusion; instead, the conclusion is irrelevant.)
- Straw man: Misrepresenting an opponent's views.
This next group is conveniently expressed in a premise-conclusion format:
- Appeal to the crowd: Most people believe A; therefore, A is true.
- Appeal to ignorance: No one has proved A; therefore, A is false. Or: no one has disproved A; therefore, A is true. (This fallacy isn't just where someone talks in ignorance.)
- Part-whole: It is F; therefore, all its parts are F. Or: all its parts are F; therefore, it is F.
- Genetic fallacy: We can explain why you believe A; therefore, A is false.
- Opposition: Our opponents believe A; therefore, A is false.
- Post hoc ergo propter hoc (after this therefore because of this): A happened after B; therefore, A was caused by B.
This next group can be either correct or faulty reasoning:
- Appeal to authority: To be correct, there must be (1) an appeal to a genuine authority on the subject, (2) a consensus of such authorities, and (3) a conclusion that the belief is probably right (and not that it must be right).
- Ad hominem (personal attack): To be correct, (1) the grounds of the attack must be relevant to the person's rational competence and (2) the conclusion must say that the person's belief isn't rationally held (and not that it's false).
- Pro-con: To be correct, there must be (1) a fair appraisal of pros and cons, and (2) a premise that says that one of these outweighs the other.
This last group has fallacies that don't fit in the previous groups:
- Appeal to force: Using threats or intimidation to get a conclusion accepted.
- Black and white thinking: Oversimplifying by assuming that one or another of two extremes must be true.
- Complex question: Asking a question that assumes the truth of something false or doubtful.
- False stereotype: Assuming that members of a certain group are more alike than they are.
I suggest that you go through the names of the various fallacies and try to explain in your own words what each fallacy involves. To do the fallacy exercises well, you need to (a) understand what each fallacy involves, (b) see what is wrong with the passage that you're dealing with, and (c) match what is wrong with the passage to one or more of the fallacies.
INFO: Display logic rules.
GETANS: Have LogiCola get you the next answer.
DOPROB: Have LogiCola finish the whole problem for you.
REPEAT: Do the previous problem again with scoring disabled.